Affinity Designer - Desktop/iPad

* Design a Digital Planner in Affinity Suite 
How to Design a Digital Planner in Affinity Suite
Affinity Designer - Using Multiple Artboards
In this tutorial, we will create a template in Affinity Designer and learn how to use multiple artboards.
Affinity Designer 2 Common Custom Settings
Affinity Designer 2 customize user interface. How to change color and contrast setting for the User Interface, custom presets for the snapping behavior and Tools panel and a special stroke default setting in the Stroke panel.
Affinity Designer 2 Custom Tools Panel
In this Affinity Designer 2 tutorial, we will learn how to customize the Tools panel. Each artist has a unique way to create art, customizing the Tools panel to match that process is very important to the artistic workflow. You will find that the Tools panel in Affinity Designer 2 is very flexible.
Affinity Designer DIY Vector Brush - Base Image
Now that we have our paw print image, we are ready to build the base image for our vector brush in Affinity Designer. We want our brush to create a continuous path of paw prints. We can achieve this by setting the paw print image, called a texture, to repeat along the vector path.
Affinity Designer DIY Vector Brush - Paw Print
In this tutorial, we will create a custom vector brush in Affinity Designer from scratch and take a look at the Brushes panel and other tools we can use to customize and style our brush.
Affinity Designer DIY Vector Brush - The Brush
Now that we have our new base image for our custom brush exported as a .png, we can turn it into a vector brush.
Affinity Designer Thank You Card
Let's continue with the thank you card design that we are creating in Affinity Designer. We are ready to size and position the shapes on the canvas.
Designer 2 Custom Settings Step by Step
We have discussed a few commonly requested changes for the Affinity Designer user interface. Below, we have step-by-step instructions for making those changes.
Digital Manikin - Layer Hierarchy
At this point, we can't bend the arm at the elbow or wrist. So, we need to group some layers again but this time we will separate them in to subgroups for the three sections of the arm (upper arm, lower arm and hand sections).
Digital Manikin - Layers Panel
In this Affinity Designer tutorial, we will continue to work on our digital artist manikin. Now we will set up the arm and hand sections so that they will be posable.
Digital Manikin - Moveable Joints
In this Affinity Designer tutorial, we will work on the Transform Origin points that will make the joints moveable.
Digital Manikin - The Arm
In this fourth Affinity Designer tutorial in the series, we will start to work on the line art for the arms, legs and torso of our posable digital manikin.
Digital Manikin - The Arm Joints
Now we will divide the arm in to three sections, so that we can make it poseable. We need the ends of each section to overlap slightly. You can think of this as a joint.
Digital Manikin - The Face
Now we are ready to add the guidelines for placing the eyes, eyebrows, ears, nose and mouth. But this time we will be drawing the guidelines instead of dragging them from the Rulers.
Digital Manikin - The Head
In this third Affinity Designer tutorial in the series, we are ready to draw the line art for our digital manikin.
Digital Manikin - The Torso
Now that we have the head and face looking more like a human, let's do a quick touch up on the torso. We will draw the line art for the torso into one, more shapely, object.
Digital Manikin Body Proportions
In this second Affinity Designer tutorial in the series, we will continue to work on our digital manikin.
DIY Wedding Suite - Striped Patterned Background
In this Affinity Designer tutorial, we will create a simple striped repeat pattern, which will be one option for the background design for our wedding invitation suite. As with most digital patterns, we will make ours 12 x 12 inches at 300 dpi. So, it can be used for other projects too.
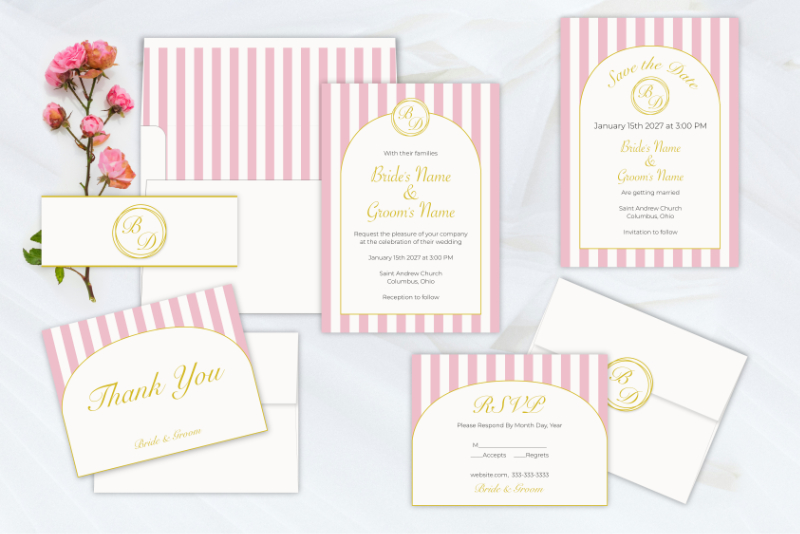
DIY Wedding Invitation Suite Template
In the next few Affinity Designer tutorials, we will create a wedding invitation suite template. This is a fun project for the DIY bride. Also many designers who have their own cutting machine have turned creating wedding stationary in to a business.
DIY Wedding Suite - RSVP and Thank You Cards
In this Affinity Designer tutorial, we will create the RSVP response card and the Thank You card for our DIY Wedding Suite.
DIY Wedding Suite Template - 5 x 7 Inches Template
In this Affinity Designer tutorial, we will continue to work on our DIY wedding invitation suite. We will create the 5 inches by 7 inches template for the save the date and the invitation cards.
DIY Wedding Suite Template - 5.5 x 4.25 Card
In this Affinity Designer tutorial, we will create a DIY wedding template for the Thank You and RSVP cards in our wedding suite.
DIY Wedding Suite Template - Art Deco Background
In this Affinity Designer tutorial, we will create a simple Art Deco styled background, which will be one option for the background design for our wedding invitation suite.
DIY Wedding Suite Template - Art Deco Invitation
In this Affinity Designer tutorial, we will add the text to the 5 by 7 inches invitation template that is part of the DIY Wedding Suite. We will continue to work on the ArtDecoTemplate.afdesign file.
DIY Wedding Suite Template - Monograms
We will continue to work on the DIY wedding invitation suite template. Another design element for the wedding suite will be a monogram including the first letters from the names of the bride and groom. In this tutorial, we will create two monograms.
DIY Wedding Suite Template - Text Containers
In this Affinity Designer tutorial, we will continue to work on our DIY wedding invitation suite. We will start with a solid colored shape. This shape will be the text container for the text on the card. We will create two text containers.
DIY Wedding Suite Template Art Deco Save the Date
In this Affinity Designer tutorial, we will create the Save the Date template for our DIY wedding suite. We will start with the finished wedding invitation template. We will remove the text that we used for that invitation and replace it with the text for this template.
Global Colors in Affinity Designer
In this last tutorial in the series, we will be working with the Global Colors. We can use Global Colors to make subtle changes in the color of the wood. Or, you can go crazy with color to make a bright and fun background.
Halloween Pumpkin Sticker in Affinity Designer 2
In this Affinity Designer 2 tutorial, we will create a Halloween digital sticker for GoodNotes. Using a royalty free image of a pumpkin from Pixabay, we will draw our pumpkin sticker with the drawing tools and add texture with brushes.
Halloween Skull Coloring Page in Affinity Designer
In this Affinity Designer tutorial, we will create a black and white Halloween image. This image would be great for a coloring page or accent on a planner page. We will use the Threshold Adjustment control to enhance the intricate lines and crevices of the skull.
How to Make Halloween Pattern Papers
In this Affinity Designer tutorial, we will create digital scrapbooking paper for your Halloween or Fall project. The paper will be a simple stripped design in shades of orange.
INDEX - Artist Manikin in Affinity Designer
In the next few Affinity Designer tutorials, we will make our own digital version of an artist manikin.
Plaid Background and Power Duplicate
In the previous Affinity Designer 2 tutorial, we set up the basic line that we will use to create a country style plaid pattern. Now it's time to duplicate that line downward from the top to bottom of the Canvas
Plaid Background in Affinity Designer V2
In this Affinity Designer 2 tutorial, we will make a plaid background that can be used for any project. We will create a black and white plaid but we can change the color as needed for each project.
Power Duplicate in Affinity Designer
At this point in the Affinity Designer tutorial, we have drawn the first in a group of lines that will create the paneling for our background graphic. We will use the Power Duplicate function to duplicate this line across the canvas.
Quick Look - Affinity Designer
Affinity Designer by Serif Ltd. is a new graphic design app. Beginners will find Affinity Designer very beginner-friendly and professionals will love how it will enhance their workflow.
Raster or Vector Brush Strokes
Do you like to create your own custom vector brushes? If so, do you know the difference between a vector and raster based brush. Are you surprised to find that there are really two types of vector brushes.
Repeat Pattern Template in Affinity Designer
It's easy to create a repeat pattern in Affinity Designer, especially if you create your own template. This template will use the Symbol feature in Affinity Designer to create the seamless repeat tile and the auto update feature for a live preview of the results.
Thank You Card in Affinity Designer
In this Affinity Designer tutorial, we will create a simple geometric thank you card design. This is a great tutorial for the beginner, as you will learn how easy it is to use the shape and text tools in Designer.
The Affinity Designer Brushes Panel
The Brushes panel is the place to import, access, reset, export and delete brushes in Affinity Designer. In this tutorial, we will walk through the basic "maintenance" tasks.
Wood Textures in Affinity Designer
At this point in this Affinity Designer tutorial, we have a simple background graphic, with a group of vertical lines centered and distributed evenly across the canvas. In this part of the tutorial, we will add some wood texture to add a little interest.
Wooden Background Graphic in Affinity Designer
In this Affinity Designer tutorial, we will create a background graphic for your next project. This background graphic will be an illustration of wood paneling.
Top Ten Articles
Previous Features
Site Map
Content copyright © 2018 by . All rights reserved.
This content was written by . If you wish to use this content in any manner, you need written permission. Contact Diane Cipollo for details.